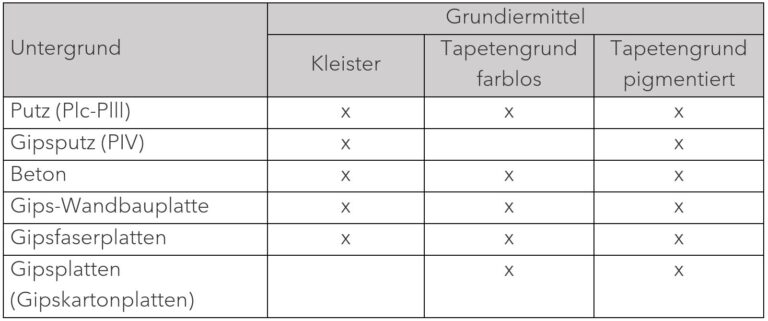
- The substrate must be dry, stable, evenly absorbent, clean, dust-free, smooth, sufficiently even for wallpapering and of a neutral colour.
- Remove stains or colour differences on the wall with a suitable pigmented wallpaper primer to prevent them from shining through.
- Cracks, holes and unevenness must be repaired with suitable measures before wallpapering.
- Allow freshly plastered surfaces to dry thoroughly.
- Set highly absorbent surfaces with a suitable unpigmented or water-based primer.
- The substrate must still be evenly absorbent after the primer coat.
- Primer:
- Check and visually inspect the membranes BEFORE processing for deviations and/or defects and, if necessary, apply the adhesive in an upturned position.
- Preliminary tests/sample tests
- Start at the window or light source
- Ensure room temperature +18 to +25C, humidity 30 to 60% and draught
- Bring the natural surface to room temperature before unpacking.
- The golden paper needs time to soften, otherwise it will wrinkle on the wall and only partially smooth out again.
- Apply a generous amount of clear, clean water to the back of the sheet using a sponge – the soaking time is approx. 7-10 minutes.
- During the soaking time, the wallpaper backing must be kept permanently moist.

- Mark the first track vertically.
- Apply a thick and even layer of paste to the surface to be wallpapered using a short pile roller and a brush in the corners.
- Insert the soaked golden paper into the adhesive bed starting from the top.
- Press on the sheets with a rubber roller without bubbles or creases.
- Cut off any excess, e.g. on the ceiling or floor, using a wallpaper ruler and cutter knife.

- Apply the adhesive for the second sheet to be laid.
- Each strip overlaps the previous one by approx. 2cm.
- Observe the edge tolerance of 1-2 mm.
- Use a wallpapering rail or a long ruler to cut through both strips at the same time so that they lie together on the seam.
- Press the rail or ruler down firmly and use a sharp blade to prevent the soaked strips from tearing when cutting.
- Then press on with a seam roller.
- Alternative: Cut the sheets exactly to the side and glue them together.

- Due to the scattered look, there is no need for a repeat when gluing.
- Cutter knife and wallpapering scissors
- Short pile roller & brush (for the corners)
- Line laser or plumb bob
- Rubber roller & seam roller
- Wallpaper ruler
- Clean lint-free cloth & fine clean brush
- We recommend Glutolin ECC extra clear for applying ORGANOID wallpapers.
- The manufacturer’s processing instructions must be observed.
- The adhesive can be purchased directly from ORGANOID (5kg bucket). (Shoplink)
- Dab off paste stains on the surface with a dry cloth (light products with low material application) or a damp cloth (products with a high fibre and binder content).
- When drying, it is important to keep the windows closed and not to heat excessively. The optimum temperature is 18 to 22 °C without draughts.
- After the wallpaper has dried, remove any detached natural fibres with a dry cloth or soft brush. The possible detachment of the fibres is due to the absorption of the adhesive moisture and is a natural behaviour.
- Peel off the wallpaper and remove any residue with a spatula or scraper.
- Tip: Cut the wallpaper into strips beforehand to make it easier to remove (pre-treat with water and wallpaper remover if necessary).
- Store the product in closed, dry rooms at normal temperatures (approx. 20°C, 30-60% relative humidity) protected from light.
- Roll goods: hanging storage system (e.g. paternoster)
- Single decks: horizontal position (e.g. drawer system)
- Any deviations and/or defects in the goods must be reported to ORGANOID immediately in writing. Please check whether the delivery has any deviations and/or defects before installation.
- Natural surfaces from ORGANOID consist of natural plant fibres, which is why individual products of the same type may differ slightly in colour, smell or fibre composition.
- Dimensional deviations of up to +/- 2% are technically unavoidable with these natural products. Minor deviations in the area of these biological characteristics therefore do not constitute defects and do not provide a basis for warranty claims.
The complete processing instructions are available for download here: