Our Service Commitment
- Video tutorials
- Fast problem-solving
- Service & product training
- Dedicated personal contacts
{{ text }}
close
With Organoid® surfaces, your creativity truly pays off!
These materials impress with their unique appearance, great texture, and sustainable character. Whether it’s a wall, counter, or door – they turn every project into a real eye-catcher.
Take a look at the detailed guidelines for working with our Organoid® products. Select the application and carrier material to view all the key information.
Bring to room temperature before unpacking. Store product in closed, dry rooms, at a normal temperature and protected from light (at about 20°C and 30-60 % relative humidity).
Storage recommendations:
In case any anomalies and/or defects occur, Organoid® has to be contacted in written form immediately. Please check before installation if the delivery has any anomalies and/or defects.
Natural surfaces by Organoid® are made from natural plant fibres, therefore individual products of the same type may vary in colour, smell, or texture.
Allow for the dimensions of the surfaces to vary up to +/- 2%, as they are unavoidable from a technical point of view. Small deviations due to these biological properties are therefore not a reason for complaint or warranty claims.
We recommend Glutolin ECC extra clear for the application of Organoid® wallpapers. Follow the manufacturer’s instructions for use. The glue can be purchased directly from Organoid®.
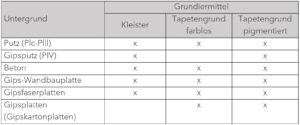
The base must be dry, stable, evenly absorbent, clean, dust-free, smooth, sufficiently even for wallpapering and of a neutral colour. Eliminate stains or colour differences on the wall with a suitable pigmented wallpaper primer to prevent them from shining through.
Cracks, holes and unevenness must be repaired with suitable measures before wallpapering. Recently plastered walls must be fully dried. Prime highly absorbent surfaces with a suitable non-pigmented or water-based primer.
Base:
Even absorption of surface needs to be ensured after priming
Recommended tools:
We recommend:
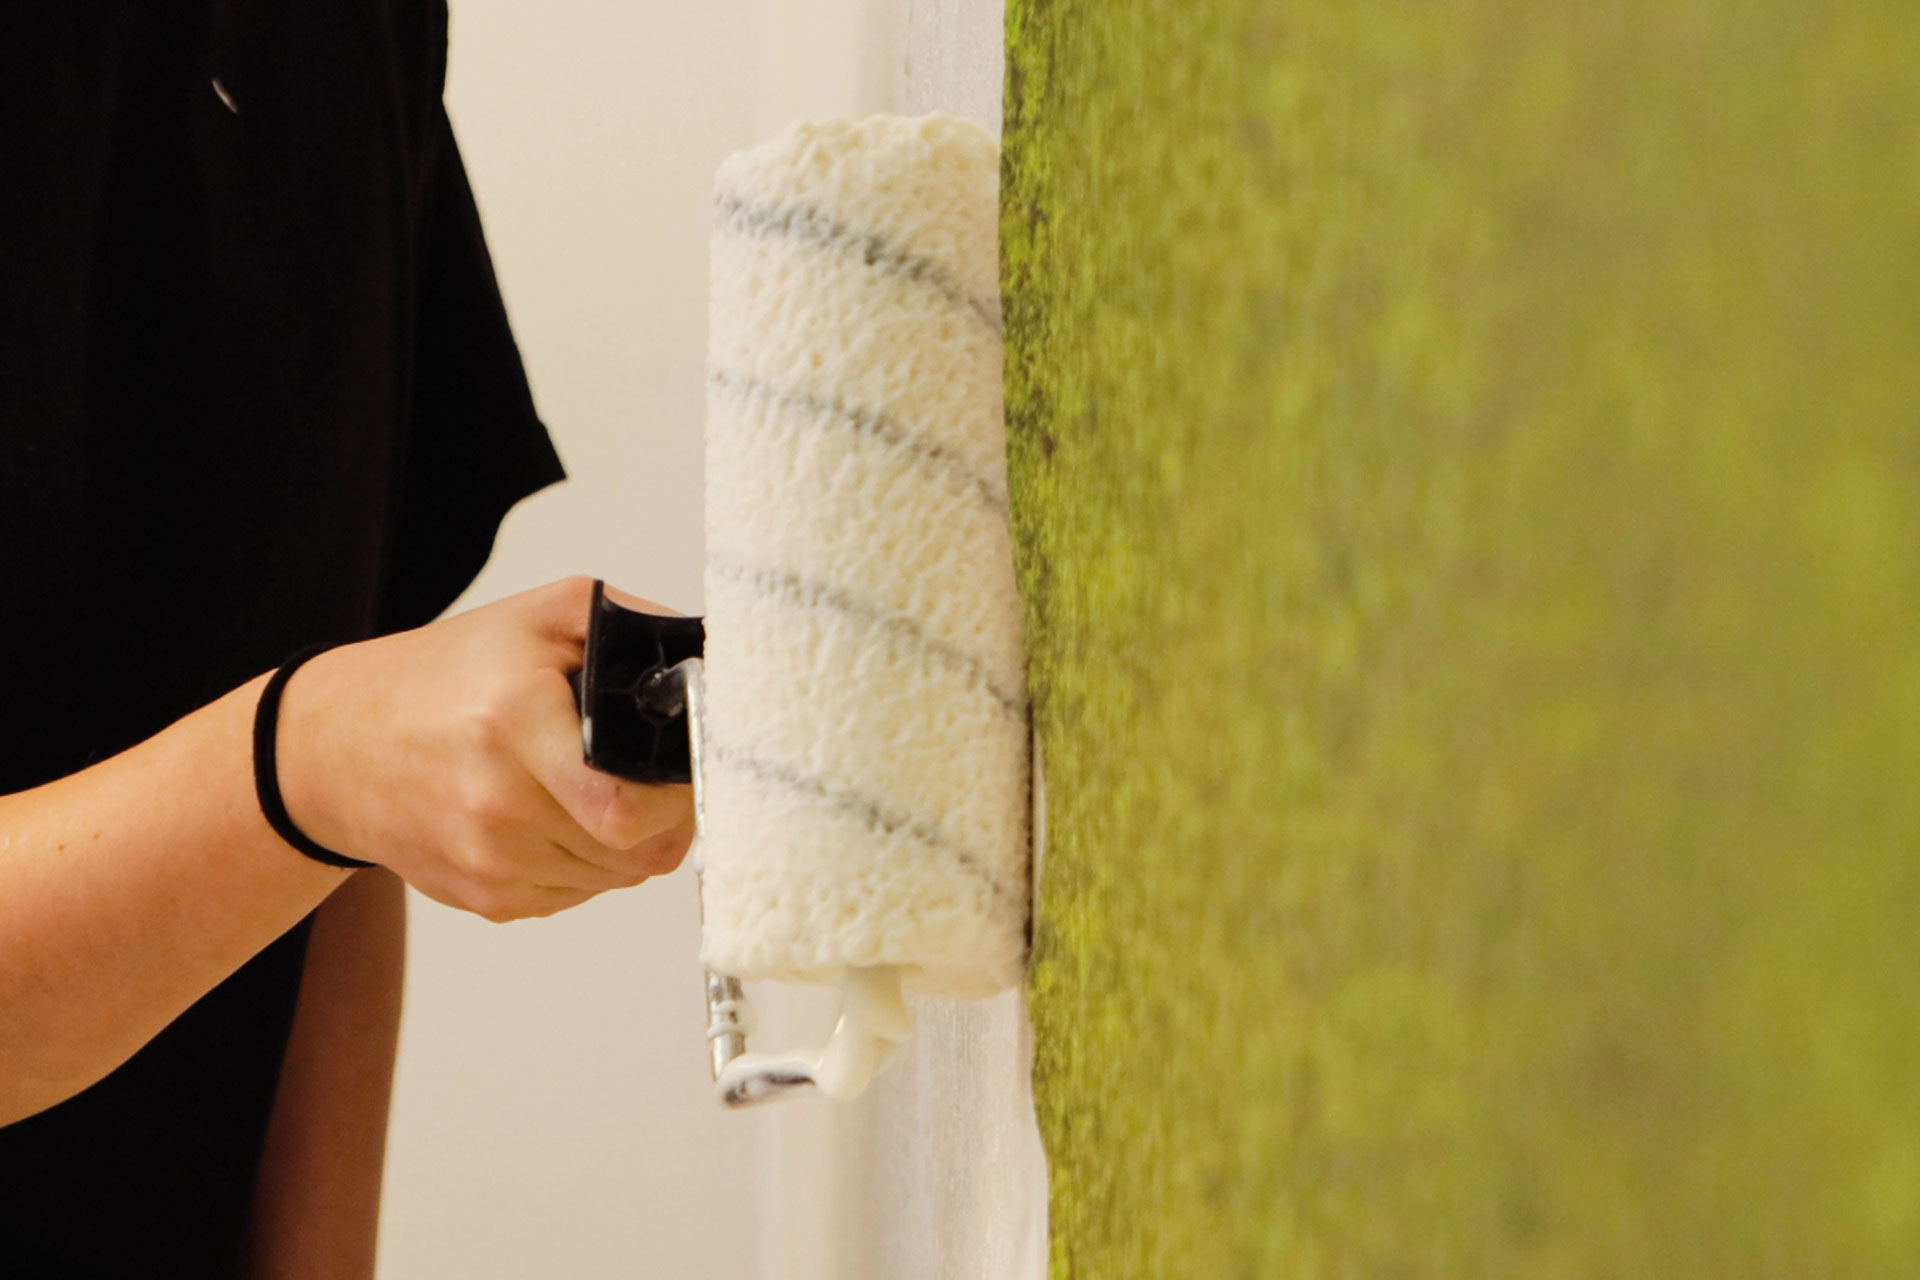
 Wallpapering technique: Create a plumb line for the first panel. Fully and evenly saturate wall for each track individually with glue, using a short-fibre paint roller and a brush for the corners. Keep back of the wallpaper dry and clean. Apply the wallpaper without pre-soaking onto the glued surface. Press down panels with rubber roller, avoiding bubbles or folds. Cut away excess wallpaper using a ruler and a cutting knife.
Overlap and double-cut: Apply the glue for the second panel. Each panel overlaps approx. 2 cm with the one next to it. Take into consideration possible imperfections 1-2 mm around the edges. Use a bar or a long ruler to cut both panels at the same time, to make them fit at the seams. Press in with a seam roller.

Free match: The naturally scattered materials do not require matching patterns between panels.
Glue stains on the surface can be removed with a dry cloth (for light-products) or a damp cloth (for premium products).
For the drying process, keep the windows closed and do not heat excessively. 18-22°C, without draft is ideal.
After the wallpaper has dried, remove detached fibres with a dry cloth. Fibres might come off due to the wallpaper being wet from the glue, which is normal. Organoid® does not bear liability to damages caused by cleaning the surface.
Pull wallpaper off the wall and remove leftovers with spatula or scraper. Tip: pre-cut wallpaper into tracks for easier removal (perhaps use water and wallpaper stripper beforehand).
Bring to room temperature before unpacking. Store product in closed, dry rooms, at a normal temperature and protected from light (at about 20°C and 30-60 % relative humidity).
Storage recommendations:
In case any anomalies and/or defects occur, Organoid® has to be contacted in written form immediately. Please check before installation if the delivery has any anomalies and/or defects.
Natural surfaces by Organoid® are made from natural plant fibres, therefore individual products of the same type may vary in colour, smell, or texture.
Allow for the dimensions of the surfaces to vary up to +/- 2%, as they are unavoidable from a technical point of view. Small deviations due to these biological properties are therefore not a reason for complaint or warranty claims.
The Organoid® products on Flax backing and Ecofleece can be processed with normal wood-working machinery. Use separating paper enclosed between hot press and surface to protect the pressing plate and do not press at temperatures higher than 60°C, in order to protect the positive properties of the natural materials. We recommend the use of white glue.
Guidelines:
Most natural surfaces generally do not have a great impact on warpage due to their low thickness. For sensitive applications, we offer a counterbalance: either empty coating paper or the empty backing material of the surface in question.
Loose natural fibre on the surface can be removed with a dry cloth or a brush.
Bring to room temperature before unpacking. Store product in closed, dry rooms, at a normal temperature and protected from light (at about 20°C and 30-60 % relative humidity).
In case any anomalies and/or defects occur, Organoid® has to be contacted in written form immediately. Please check before installation if the delivery has any anomalies and/or defects. Natural surfaces by Organoid® are made from natural plant fibres, therefore individual products of the same type may vary in colour, smell, or texture. Allow for the dimensions of the surfaces to vary up to +/- 2%, as they are unavoidable from a technical point of view. Small deviations due to these biological properties are therefore not a reason for complaint or warranty claims.
Insulation material, substructure strips, screws and dowels not included.
Infinity Panel width 192 mm with groove, with insulation, installation with screw claws
Infinity Panel width 192 mm with groove, without insulation, installation with screw claws
Bring to room temperature before unpacking. Store product in closed, dry rooms, at a normal temperature and protected from light (at about 20°C and 30-60 % relative humidity).
In case any anomalies and/or defects occur, Organoid® has to be contacted in written form immediately. Please check before installation if the delivery has any anomalies and/or defects. Natural surfaces by Organoid® are made from natural plant fibres, therefore individual products of the same type may vary in colour, smell, or texture. Allow for the dimensions of the surfaces to vary up to +/- 2%, as they are unavoidable from a technical point of view. Small deviations due to these biological properties are therefore not a reason for complaint or warranty claims.
Recommended tools:
Absorber Panel: width 1,300 mm without groove, without insulation, suspension with wedge strips
Hang the panels in the substructure wedge strips.
Bring to room temperature before unpacking. Store product in closed, dry rooms, at a normal temperature and protected from light (at about 20°C and 30-60 % relative humidity).
Storage recommendations:
In case any anomalies and/or defects occur, Organoid® has to be contacted in written form immediately. Please check before installation if the delivery has any anomalies and/or defects.
Natural surfaces by Organoid® are made from natural plant fibres, therefore individual products of the same type may vary in colour, smell, or texture.
Allow for the dimensions of the surfaces to vary up to +/- 2%, as they are unavoidable from a technical point of view. Small deviations due to these biological properties are therefore not a reason for complaint or warranty claims.
The Organoid® products on Flax backing and Ecofleece can be processed with normal wood-working machinery. Use separating paper enclosed between hot press and surface to protect the pressing plate and do not press at temperatures higher than 60°C, in order to protect the positive properties of the natural materials. We recommend the use of white glue.
Guidelines:
Most natural surfaces generally do not have a great impact on warpage due to their low thickness. For sensitive applications, we offer a counterbalance: either empty coating paper or the empty backing material of the surface in question.
Remove loose natural fibre gently using a dry cloth.
Bring to room temperature before unpacking. Store product in closed, dry rooms, at a normal temperature and protected from light (at about 20°C and 30-60 % relative humidity).
Storage recommendations:
In case any anomalies and/or defects occur, Organoid® has to be contacted in written form immediately. Please check before installation if the delivery has any anomalies and/or defects.
Natural surfaces by Organoid® are made from natural plant fibres, therefore individual products of the same type may vary in colour, smell, or texture.
Allow for the dimensions of the surfaces to vary up to +/- 2%, as they are unavoidable from a technical point of view. Small deviations due to these biological properties are therefore not a reason for complaint or warranty claims.
For installing Organoid® on golden paper as a wallpaper, we recommend the glue Glutolin ECC extra clear. Follow the manufacturer’s instructions for use. The glue can be purchased directly from Organoid®.
The base must be dry, stable, evenly absorbent, clean, dust-free, smooth, sufficiently even for wallpapering and of a neutral colour. Eliminate stains or colour differences on the wall with a suitable pigmented wallpaper primer to prevent them from shining through.
Cracks, holes and unevenness must be repaired with suitable measures before wallpapering. Recently plastered walls must be fully dried. Prime highly absorbent surfaces with a suitable non-pigmented or water-based primer.
Base:
Even absorption of surface needs to be ensured after priming.
Recommended tools:
We recommend:
Important preliminary steps:
The golden paper must be soaked in advance, or creasing will occur on the wall, with only limited possibility to smooth them out. Apply clear and clean water to the back of the wallpaper sheet using a sponge – the soaking time is approx. 7-10 minutes. During the soaking time, the back of the wallpaper must be kept permanently damp. The wallpaper is then applied using the wall pasting technique.
Wallpapering technique: Create a plumb line for the first panel. Fully and evenly saturate wall for each track individually with glue, using a short-fibre paint roller and a brush for the corners. Take the soaked golden paper and put it onto the glued surface, starting from the top. Press down panels with rubber roller, avoiding bubbles or folds. Cut away excess wallpaper using a ruler and a cutting knife.
Overlap and double-cut: Apply the glue for the second panel. Each panel overlaps approx. 2 cm with the one next to it. Take into consideration possible imperfections 1-2 mm around the edges. Use a bar or a long ruler to cut both panels at the same time, to make them fit at the seams. Firmly press down the bracket or ruler and use a sharp blade to avoid ripping the soaked wallpaper during the cutting process. Press in with a seam roller.
Alternatively: cut the stips exactly at the sides and install them edge-to-edge.
Free match: The naturally scattered materials do not require matching patterns between panels.
Glue stains on the surface can be removed with a clean, damp cloth. For the drying process, keep the windows closed and do not heat excessively. 18-22°C, without draft is ideal.
After the wallpaper has dried, remove detached fibres with a dry cloth. Fibres might come off due to the wallpaper being wet from the glue, which is normal.
Organoid® does not bear liability to damages caused by cleaning the surface.
Pull wallpaper off the wall and remove leftovers with spatula or scraper.
Tip: pre-cut wallpaper into tracks for easier removal (perhaps use water and wallpaper stripper beforehand).
Bring to room temperature before unpacking. Store product in closed, dry rooms, at a normal temperature and protected from light (at about 20°C and 30-60 % relative humidity).
Storage recommendations:
In case any anomalies and/or defects occur, Organoid® has to be contacted in written form immediately. Please check before installation if the delivery has any anomalies and/or defects.
Natural surfaces by Organoid® are made from natural plant fibres, therefore individual products of the same type may vary in colour, smell, or texture.
Allow for the dimensions of the surfaces to vary up to +/- 2%, as they are unavoidable from a technical point of view. Small deviations due to these biological properties are therefore not a reason for complaint or warranty claims.
The strong adhesive foil is suitable for direct adhesion on smooth and rough surfaces, e.g. plasterboard, concrete, metal, glass, wooden panels and other materials. The surface must be in good condition, dry, clean and dust free.
Recommended tools:
Different methods can be used to adhere the material to the underground. Depending on the size of the surface, the material or to have a little leftover as possible. Vertical and horizontal use is possible. Tip: it is best to work in a team of two people.
Loose natural fibre on the surface can be removed with a dry cloth or a brush.
Our adhesive foil is a permanent adhesive with high strength, which enables excellent adhesion on a number of different smooth and structured surfaces. A clean and damage-free removal of the surface cannot be expected. We recommend testing the adhesion and removal before use.
Tips for removing self-adhesive foil:
Bring to room temperature before unpacking. Store product in closed, dry rooms, at a normal temperature and protected from light (at about 20°C and 30-60 % relative humidity).
In case any anomalies and/or defects occur, Organoid® has to be contacted in written form immediately. Please check before installation if the delivery has any anomalies and/or defects. Natural surfaces by Organoid® are made from natural plant fibres, therefore individual products of the same type may vary in colour, smell, or texture. Allow for the dimensions of the surfaces to vary up to +/- 2%, as they are unavoidable from a technical point of view. Small deviations due to these biological properties are therefore not a reason for complaint or warranty claims.
Cable suspensions, insulating material and hook bolts included in the scope of delivery.
Bring to room temperature before unpacking. Store product in closed, dry rooms, at a normal temperature and protected from light (at about 20°C and 30-60 % relative humidity).
Storage recommendations:
In case any anomalies and/or defects occur, Organoid® has to be contacted in written form immediately. Please check before installation if the delivery has any anomalies and/or defects.
Natural surfaces by Organoid® are made from natural plant fibres, therefore individual products of the same type may vary in colour, smell, or texture.
Allow for the dimensions of the surfaces to vary up to +/- 2%, as they are unavoidable from a technical point of view. Small deviations due to these biological properties are therefore not a reason for complaint or warranty claims.
We recommend Glutolin ECC extra clear for the application of Organoid® wallpapers. Follow the manufacturer’s instructions for use. The glue can be purchased directly from Organoid® .
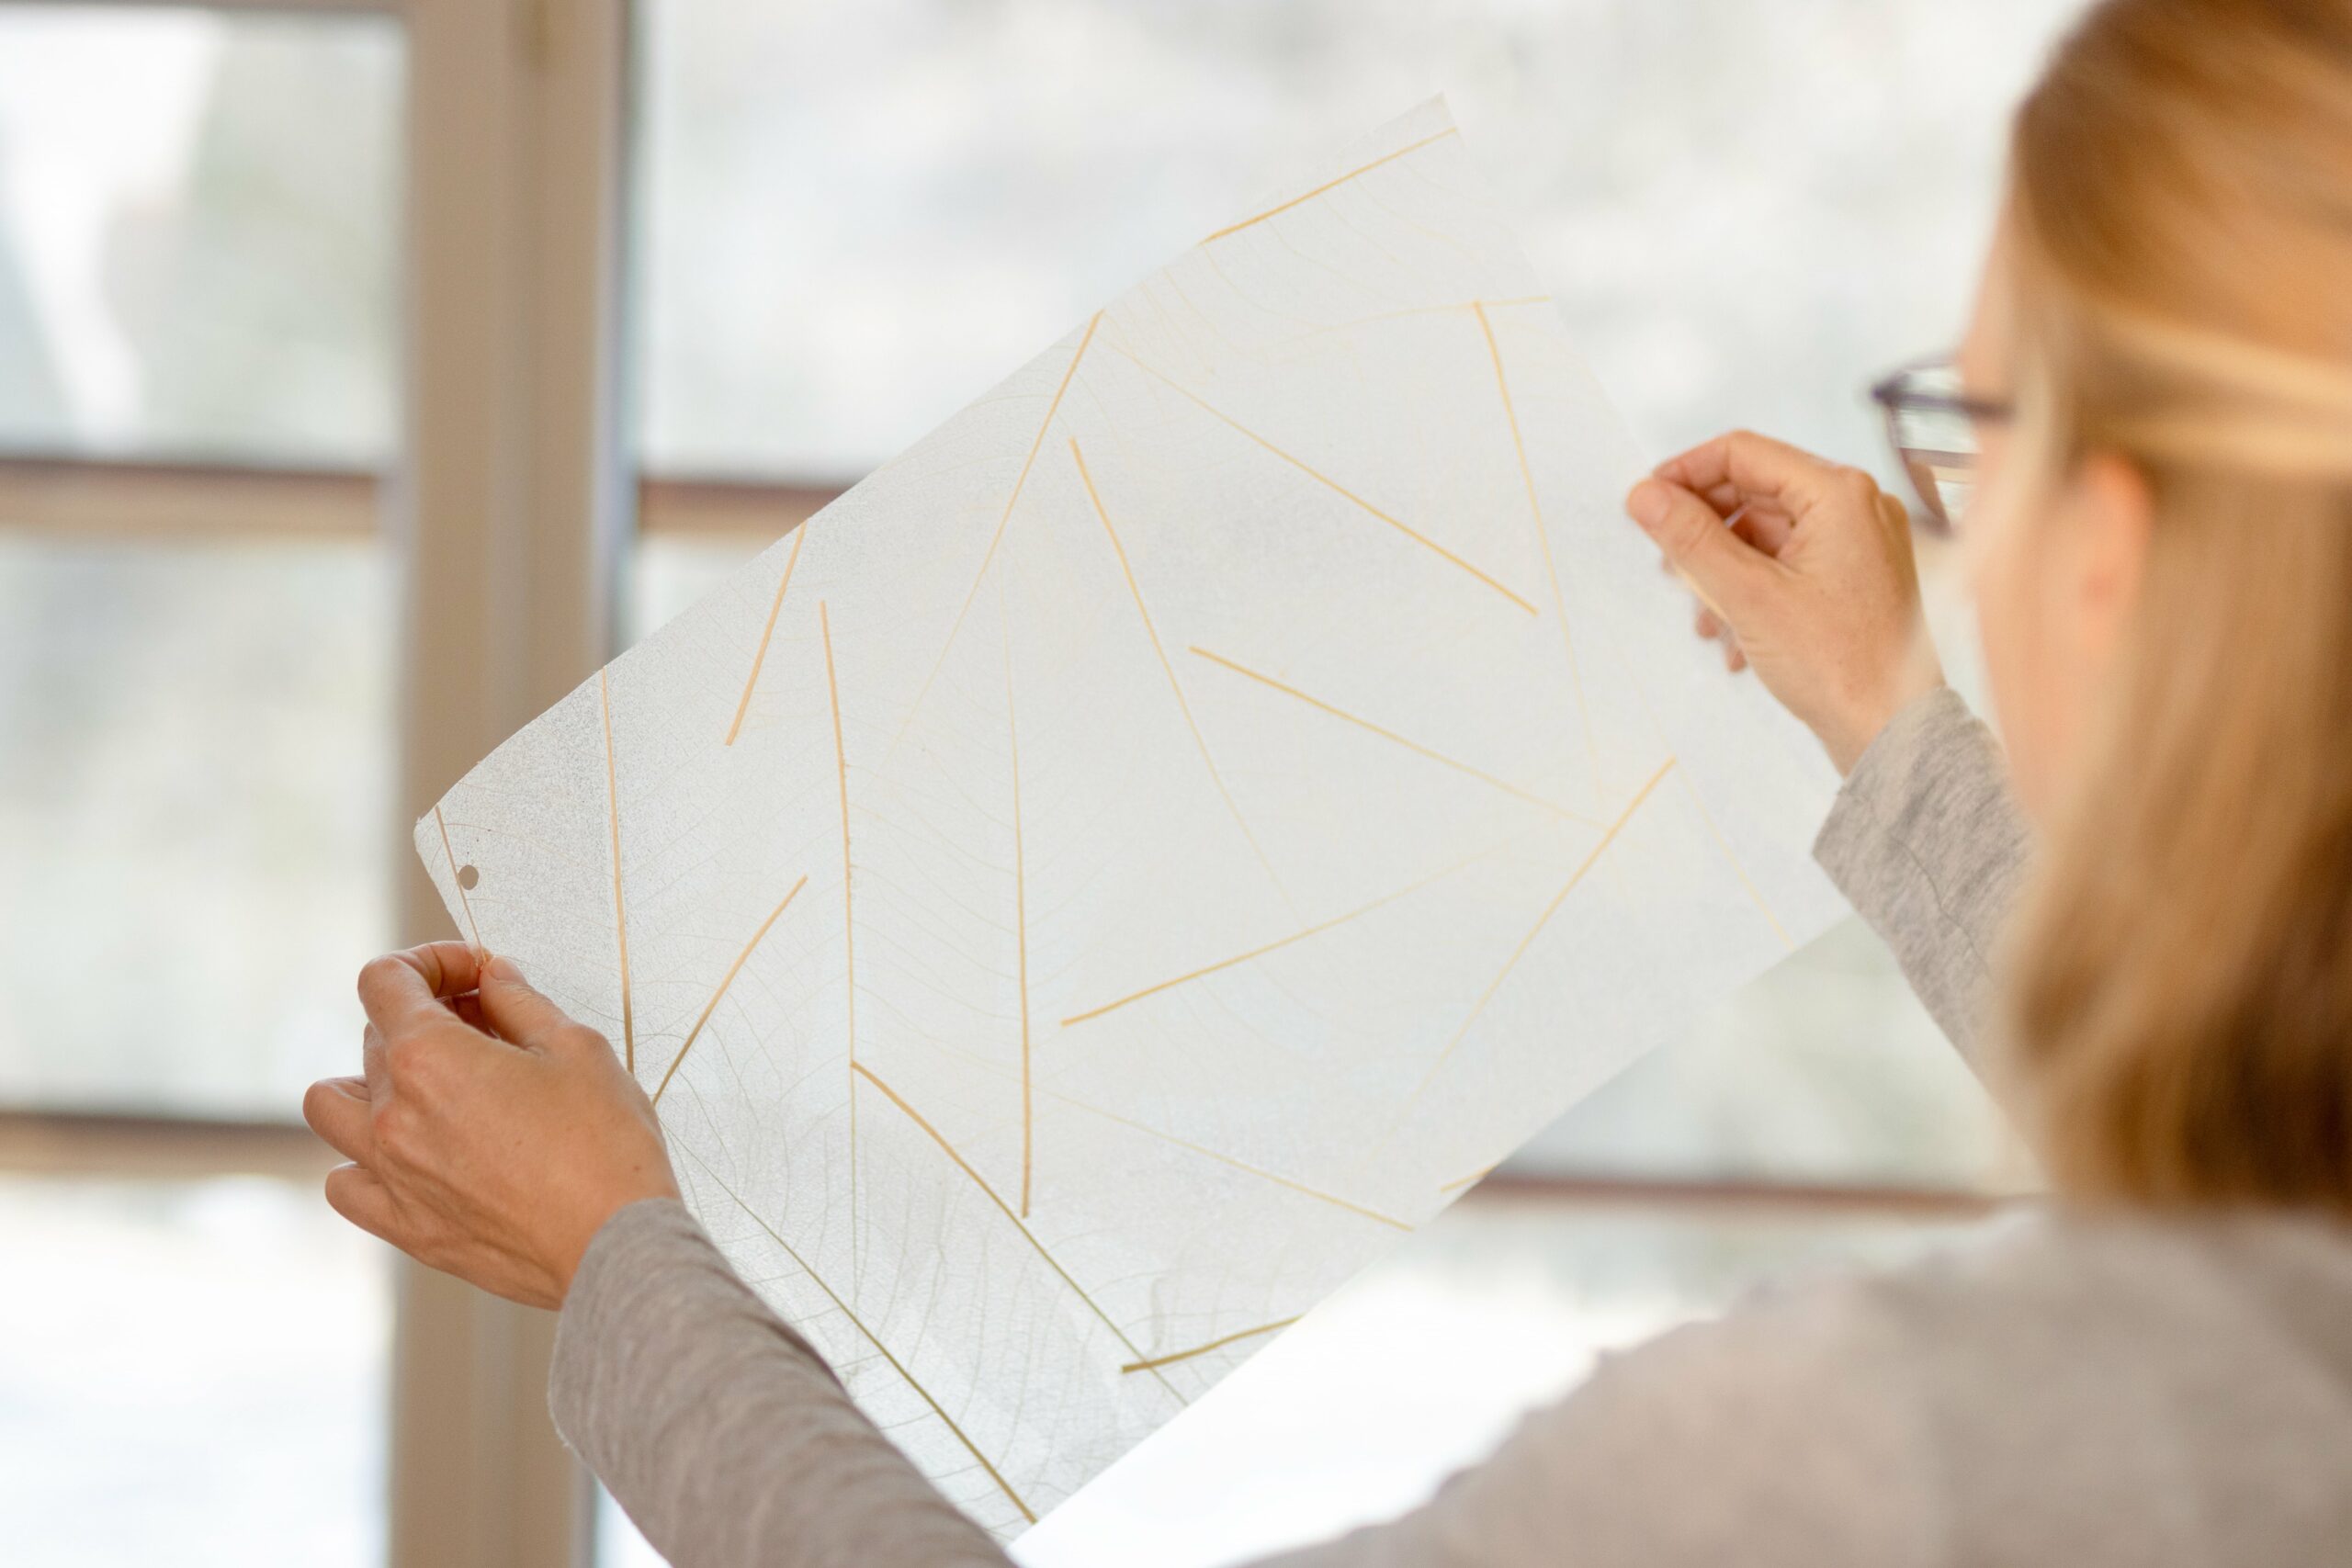
KAFFEELEDER on Flexi: This surface tends to form mycelia when stored in complete darkness, as it contains moisture and spores that occur naturally in coffee particles. This white film is completely harmless and does not spread to other products. It can easily be removed with a soft cloth. Moreover, the effect only occurs when the product is stored for an extended period of time and can easily be remedied. It has not been observed in the built in product.
The base must be dry, stable, evenly absorbent, clean, dust-free, smooth, sufficiently even for wallpapering and of a neutral colour. Eliminate stains or colour differences on the wall with a suitable pigmented wallpaper primer to prevent them from shining through.
Cracks, holes and unevenness must be repaired with suitable measures before wallpapering. Recently plastered walls must be fully dried. Prime highly absorbent surfaces with a suitable non-pigmented or water-based primer.
Base:
Even absorption of surface needs to be ensured after priming.
Recommended tools:
We recommend:
Wallpapering technique: Create a plumb line for the first panel. Fully and evenly saturate wall for each track individually with glue, using a short-fibre paint roller and a brush for the corners. Keep back of the wallpaper dry and clean. Apply the wallpaper without pre-soaking onto the glued surface. Press down panels with rubber roller, avoiding bubbles or folds. Cut away excess wallpaper using a ruler and a cutting knife.
Overlap and double-cut: Apply the glue for the second panel. Each panel overlaps approx. 2 cm with the one next to it. Take into consideration possible imperfections 1-2 mm around the edges. Use a bar or a long ruler to cut both panels at the same time, to make them fit at the seams. Press in with a seam roller.
Free match: The naturally scattered materials do not require matching patterns between panels
Dab off paste stains on the surface with a cloth. For the drying process, keep the windows closed and do not heat excessively. 18-22°C, without draft is ideal.
After the wallpaper has dried, remove detached fibres with a dry cloth. Fibres might come off due to the wallpaper being wet from the glue, which is normal.
Organoid® does not bear liability to damages caused by cleaning the surface.
Pull wallpaper off the wall and remove leftovers with spatula or scraper. Tip: pre-cut wallpaper into tracks for easier removal (perhaps use water and wallpaper stripper beforehand).
Bring to room temperature before unpacking. Store product in closed, dry rooms, at a normal temperature and protected from light (at about 20°C and 30-60 % relative humidity).
Storage recommendations:
In case any anomalies and/or defects occur, Organoid® has to be contacted in written form immediately. Please check before installation if the delivery has any anomalies and/or defects.
Natural surfaces by Organoid® are made from natural plant fibres, therefore individual products of the same type may vary in colour, smell, or texture.
Allow for the dimensions of the surfaces to vary up to +/- 2%, as they are unavoidable from a technical point of view. Small deviations due to these biological properties are therefore not a reason for complaint or warranty claims.
The Organoid® products on Flax backing and Ecofleece can be processed with normal wood-working machinery. Use separating paper enclosed between hot press and surface to protect the pressing plate and do not press at temperatures higher than 60°C, in order to protect the positive properties of the natural materials. We recommend the use of white glue.
Guidelines
Most natural surfaces generally do not have a great impact on warpage due to their low thickness. For sensitive applications, we offer a counterbalance: either empty coating paper or the empty backing material of the surface in question.
Glue stains on the surface can be removed with a dry cloth or a brush.
Bring to room temperature before unpacking. Store product in closed, dry rooms, at a normal temperature and protected from light (at about 20°C and 30-60 % relative humidity).
Storage recommendations:
In case any anomalies and/or defects occur, Organoid® has to be contacted in written form immediately. Please check before installation if the delivery has any anomalies and/or defects.
Natural surfaces by Organoid® are made from natural plant fibres, therefore individual products of the same type may vary in colour, smell, or texture.
Allow for the dimensions of the surfaces to vary up to +/- 2%, as they are unavoidable from a technical point of view. Small deviations due to these biological properties are therefore not a reason for complaint or warranty claims.
The strong adhesive foil is suitable for direct adhesion on smooth and rough surfaces, e.g. plasterboard, concrete, metal, glass, wooden panels and other materials. The surface must be in good condition, dry, clean and dust free.
Recommended tools:
Different methods can be used to adhere the material to the underground. Depending on the size of the surface, the material or to have a little leftover as possible. Vertical and horizontal use is possible. Tip: it is best to work in a team of two people.
Loose natural fibre on the surface can be removed with a dry cloth or a brush.
Our adhesive foil is a permanent adhesive with high strength, which enables excellent adhesion on a number of different smooth and structured surfaces. A clean and damage-free removal of the surface cannot be expected. We recommend testing the adhesion and removal before use.
Tips for removing self-adhesive foil:
Bring to room temperature before unpacking. Store product in closed, dry rooms, at a normal temperature and protected from light (at about 20°C and 30-60 % relative humidity).
Storage recommendations:
In case any anomalies and/or defects occur, Organoid® has to be contacted in written form immediately. Please check before installation if the delivery has any anomalies and/or defects.
Natural surfaces by Organoid® are made from natural plant fibres, therefore individual products of the same type may vary in colour, smell, or texture.
Allow for the dimensions of the surfaces to vary up to +/- 2%, as they are unavoidable from a technical point of view. Small deviations due to these biological properties are therefore not a reason for complaint or warranty claims.
We recommend Glutolin ECC extra clear for the application of Organoid® wallpapers. Follow the manufacturer’s instructions for use. The glue can be purchased directly from Organoid®.
The base must be dry, stable, evenly absorbent, clean, dust-free, smooth, sufficiently even for wallpapering and of a neutral colour. Eliminate stains or colour differences on the wall with a suitable pigmented wallpaper primer to prevent them from shining through.
Cracks, holes and unevenness must be repaired with suitable measures before wallpapering. Recently plastered walls must be fully dried. Prime highly absorbent surfaces with a suitable non-pigmented or water-based primer.
Base:
Even absorption of surface needs to be ensured after priming
Recommended tools:
We recommend:
Wallpapering technique: Create a plumb line for the first panel. Fully and evenly saturate wall for each track individually with glue, using a short-fibre paint roller and a brush for the corners. Keep back of the wallpaper dry and clean. Apply the wallpaper without pre-soaking onto the glued surface. Press down panels with rubber roller, avoiding bubbles or folds. Cut away excess wallpaper using a ruler and a cutting knife.
Overlap and double-cut: Apply the glue for the second panel. Each panel overlaps approx. 2 cm with the one next to it. Take into consideration possible imperfections 1-2 mm around the edges. Use a bar or a long ruler to cut both panels at the same time, to make them fit at the seams. Press in with a seam roller.
Free match: The naturally scattered materials do not require matching patterns between panels.
Glue stains on the surface can be removed with a dry cloth (for light-products) or a damp cloth (for premium products).
For the drying process, keep the windows closed and do not heat excessively. 18-22°C, without draft is ideal.
After the wallpaper has dried, remove detached fibres with a dry cloth. Fibres might come off due to the wallpaper being wet from the glue, which is normal. Organoid® does not bear liability to damages caused by cleaning the surface.
Pull wallpaper off the wall and remove leftovers with spatula or scraper. Tip: pre-cut wallpaper into tracks for easier removal (perhaps use water and wallpaper stripper beforehand).
Bring to room temperature before unpacking. Store product in closed, dry rooms, at a normal temperature and protected from light (at about 20°C and 30-60 % relative humidity).
Storage recommendations:
In case any anomalies and/or defects occur, Organoid® has to be contacted in written form immediately. Please check before installation if the delivery has any anomalies and/or defects.
Natural surfaces by Organoid® are made from natural plant fibres, therefore individual products of the same type may vary in colour, smell, or texture.
Allow for the dimensions of the surfaces to vary up to +/- 2%, as they are unavoidable from a technical point of view. Small deviations due to these biological properties are therefore not a reason for complaint or warranty claims.
The Organoid® products on Flax backing and Eco fleece can be processed with normal wood-working machinery. Use separating paper enclosed between hot press and surface to protect the pressing plate and do not press at temperatures higher than 60°C, in order to protect the positive properties of the natural materials. We recommend the use of white glue.
Guidelines:
Most natural surfaces generally do not have a great impact on warpage due to their low thickness. For sensitive applications, we offer a counterbalance: either empty coating paper or the empty backing material of the surface in question.
Loose natural fibre on the surface can be removed with a dry cloth or a brush.
We recommend unpacking the laminate from the cardboard box. Before use, the panels should be acclimatized to room-temperature with a counterbalance for approx. 1-3 days. Store in closed, dry rooms at a normal temperature (approx. 20°C, 30-60% relative air humidity). Store horizontally on an even surface, e.g. in a drawer system. Direct contact with the floor and/or sun must be avoided.
In case any anomalies and/or defects occur, Organoid® has to be contacted in written form immediately. Please check before installation if the delivery has any anomalies and/or defects.
Natural surfaces by Organoid® are made from natural plant fibres, therefore individual products of the same type may vary in colour, smell, or texture.
Allow for the dimensions of the surfaces to vary up to +/- 2%, as they are unavoidable from a technical point of view. Small deviations due to these biological properties are therefore not a reason for complaint or warranty claims.
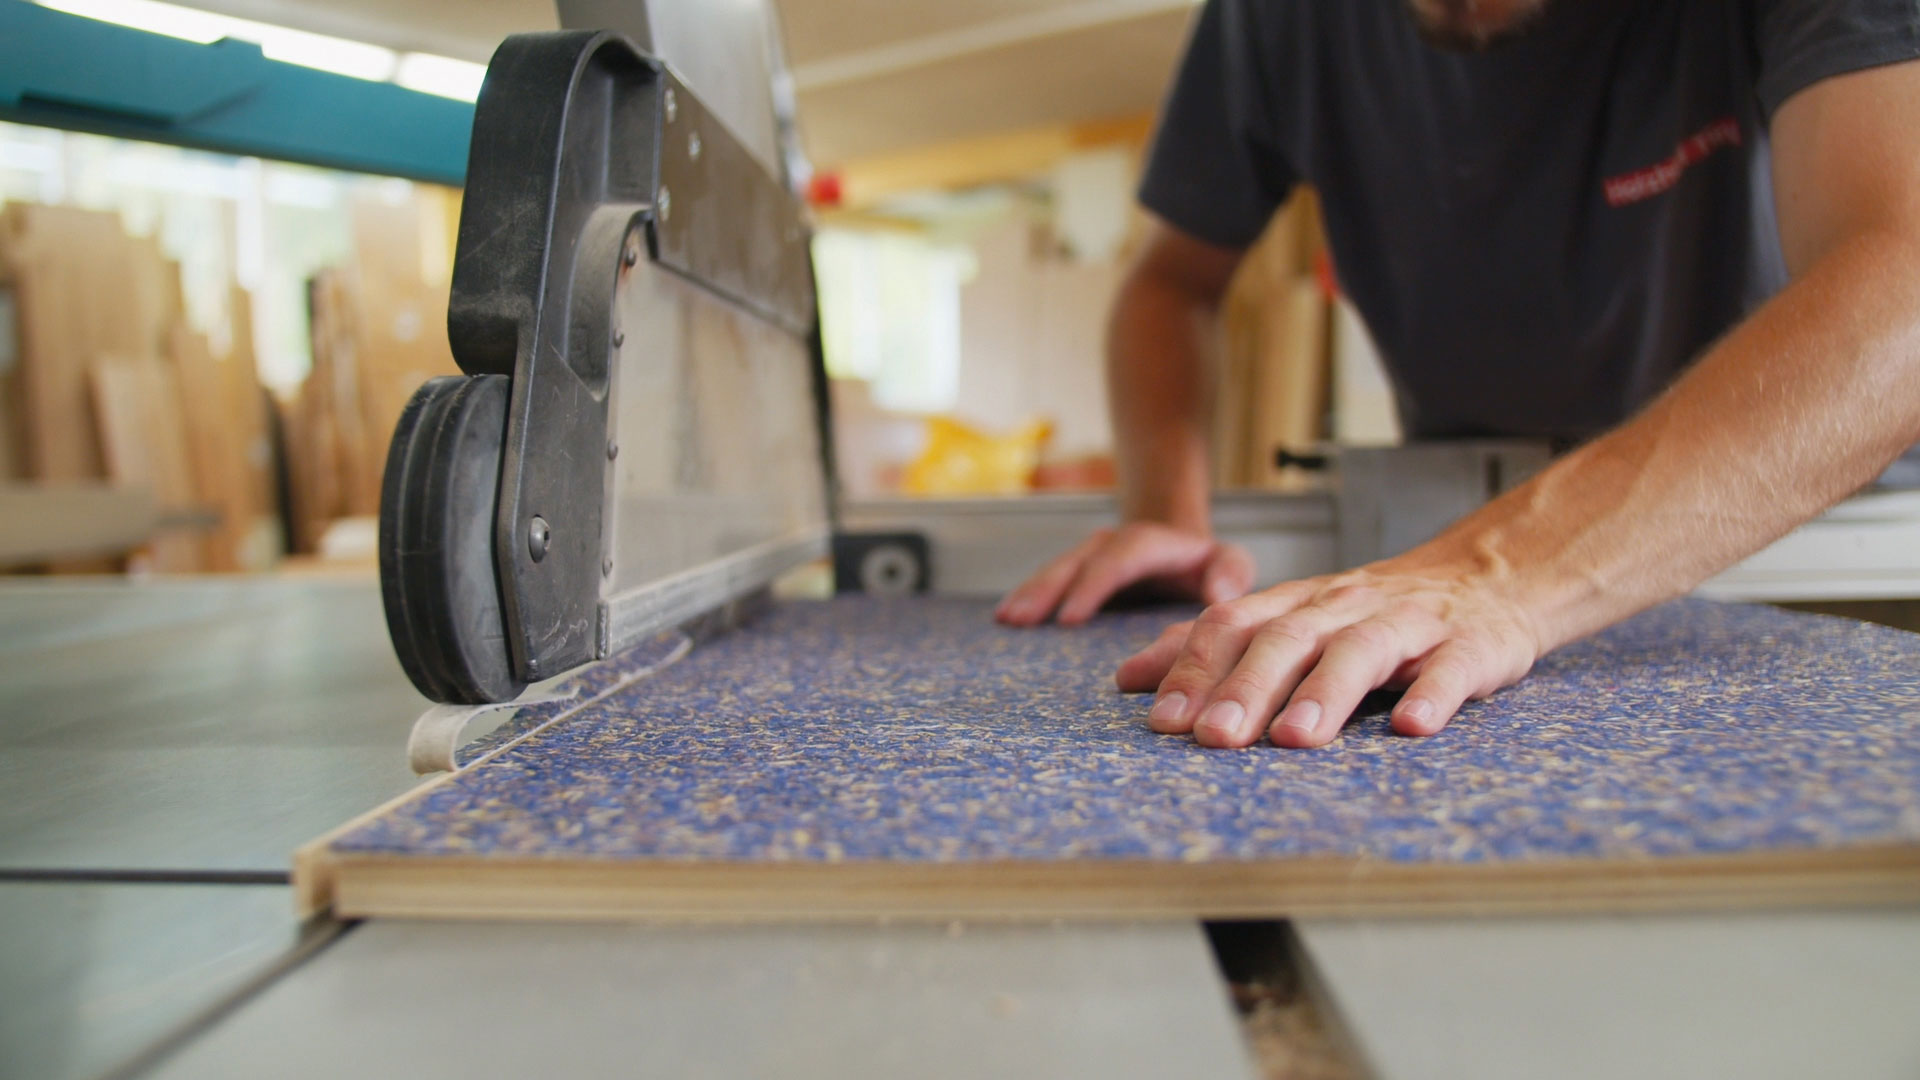
For cutting engineered wood, commonly used wood working machinery can be used. Panel saws, table saws, hand-held circular saws, jigsaws, but also CNC-milling. The usual principles and precautions apply, just like in working with any other engineered wood or laminate.
Lower feed rates and higher rotational speed are recommended for machine processing.
Natural surfaces on phenolic resin high pressure laminates and be used and processed like normal HPL-panels and pe attached to a number of different surfaces and backgrounds. Typical woodworking materials such as chipboard, MDF and HDF are compatible. When glued on solid walls or metal, a multitude of pre-trials should be conducted. The usual principles and precautions apply, just like in working with any other engineered wood or laminate.
Do not press at a temperature higher than 60°C and use the separating paper enclosed between the hot press and the surface to protect the natural qualities of the organic materials.
The back of the HPL needs to be checked for leftover materials or oils after processing and has to be cleaned carefully accordingly. Cut off 2 cm along the edges before processing, as the density of the natural material deviates due to the production process
For an ideally balanced panel structure, we recommend a symmetrical structure, meaning using the same surface on the front and back. For tension equalisation, we recommend using a counter-balance with the same thickness as the HPL used for the surface (HPL 1.1 mm, sanded on both sides, for SKELETTBLATTLA HPL 0.8 mm).
Further criteria for warpage:
Loosened natural fibre on the surface can be removed with a dry cloth or a brush.